
The 2012 and newer Wranglers (that I’m aware of, it could be older) have been using the exact same head units as everything else in Chrysler/Dodge/Jeep/Ram’s stables with the exception of the new 8.4″ units that we’re starting to see in the Dart, the RAM line, and other recently redesigned vehicles.
- The 130 – el cheap-o grande. This head unit is perfect for the folks that plan to swap out for aftermarket stereo components or if you simply don’t need anything more than just a radio and a CD player.
- The 430 – An excellent feature filled full color touch screen Nav system. The interface was designed by Garmin and the mapping software is theirs too.
- The 730 – Chrysler’s top end system at the time including live traffic, football score updates, and a bunch of other goodies that I personally didn’t need.
In just about every Chrysler vehicle equipped with the 430 or the 730, there is a back up camera option. However when it comes to the Wrangler, Jeep simply decided not to offer that capability. Same head unit, it has the ability, they just turn it off at the factory. Seems like an easy $100 up-charge to me. Especially for my rig… She’s a got a big steel butt and that tire sticking off the end doesn’t help anything. I started to investigate into the issue a few months ago to see what my options were.
Option 1 – OEM Mopar GrandCherokee/Commander Kit
 My first thought was to keep it in the family and go with strictly MOPAR. I ordered the GrandCherokee/Commander back up camera kit which came with everything you see above. While getting the head unit replaced in my JK, I had the service guys drop the wiring behind the dash and flash the CPU for the 430N to accept a camera. After I got home, I set up the wiring for a test and toggled the 430N’s camera mode to ‘on’.
Unfortunately, that setup didn’t do the trick. When reverse was engaged, the 430N would look for a camera but nothing was sending any signals. A black screen would display telling you to check surroundings. So the camera kit went back in the box and back to Mopar. I would have liked for this to work, but in the end that specific camera housing is a bit of a pain to use on any vehicle it wasn’t intended for so maybe this is for the best.
Option 2 – NAVTool
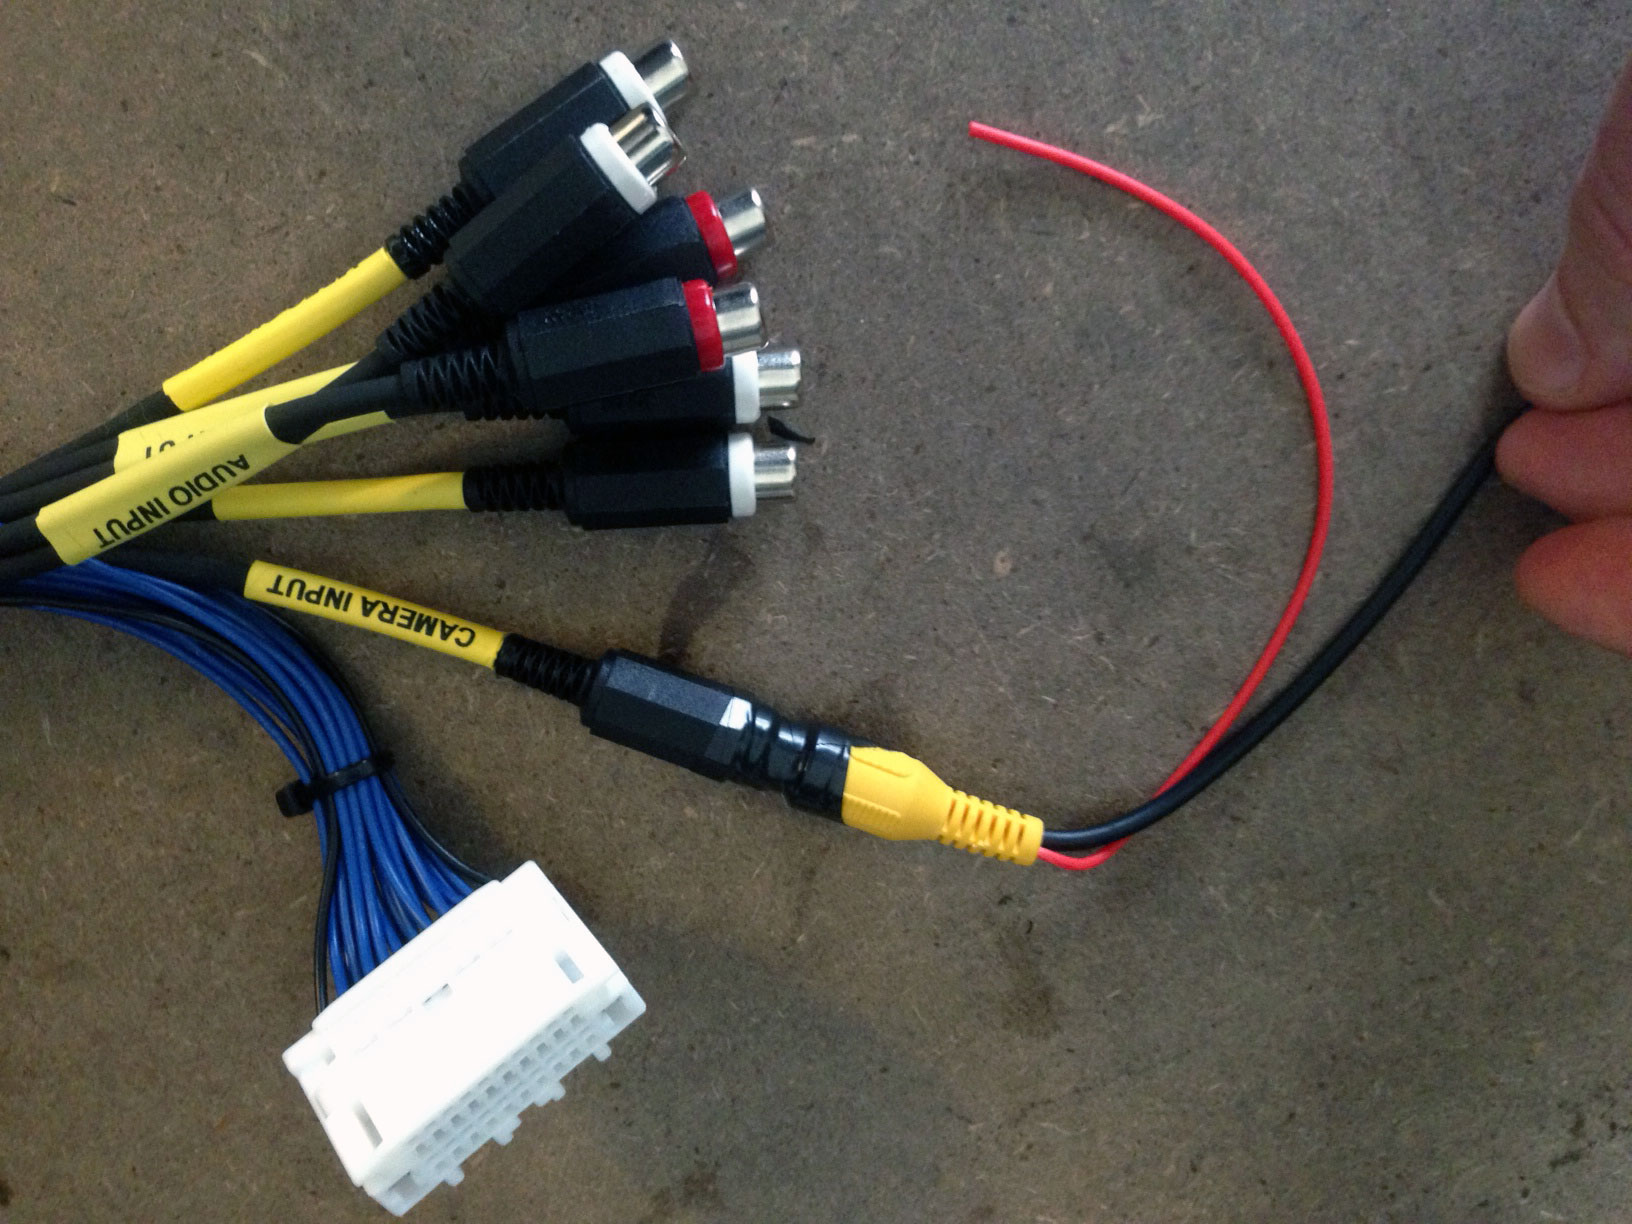
 After the Mopar kit went back, I looked around for aftermarket options. There are three companies that have a similar product. NAV-TV, MyGIG LockPick, & NAVTool. I can immediately cross off both the MyGIG LockPick & NAV-TV since they each told me their products wouldn’t work with a manual transmission. That leaves me with the kit from NAVTool. I clicked to buy and a week later a box showed up with the parts shown above. A little blue control module with two buttons, one harness, and one RCA plug wire. No instructions, nothing else, just the items shown above.
I contacted the NAVTool to see if I was missing anything, to ask what those two buttons on the control box are, and if there are any instructions. I was told to ‘just plug it in and it would work.’ No instructions, no discussion of those buttons, nothing. Just plug it in. When I told them about the missing harness that connects all the other features (pictured below), they said that plug wasn’t included but they would send it that day.
Yay! Except, they didn’t send it that day. Or the next. Or the one after that. In fact, I called them daily for several weeks and every time I was brushed off or told it was in the mail but they could never provide any shipping information. Communication with this company was incredibly sketchy. No matter what button I pushed, I ended up speaking to the same guy who would insist my case was with another department. The guy claimed he had a Wrangler that he took off-road all the time, but when I pressed him he couldn’t even name one single mod on his rig. Not one. Red flag!
 As you can see from the image above, my cable did finally arrive. But after weeks and weeks of dealing with this company, I lost any faith I may have once had in their product. I didn’t want my CPU to be a guinea pig or wind up bricked, so I contacted them to start the return process. Just like everything else with this company, it proved incredibly challenging. My case was, once again with another department at every call. I got the run around for a few days before I reached out to PayPal for a resolution. Suspiciously, once PayPal was involved NAVTool was incredibly quick to come to a refund agreement. By quick, I mean within 30 minutes quick. I contacted NAVTool to ship their product back, only to receive no reply. At this point, I’m calling the case closed and moving on with my life.
Option 3 – $20 water proof camera on Amazon
Up till now, this has been one hell of a wild goose chase. But, what I do currently have is my CPU flashed by the dealership (code ‘XAC’), the skills to easily remove the head unit, a labeled cable that accepts a standard RCA plug, and a simple sub $20 flush mount waterproof camera from Amazon. So, I decided to pull my dash, remove the head unit and give this whole thing one final run.
 The cable pictured above is from NAVTool. However, I found a very similar cable on Amazon that I think will also do the trick. I haven’t tried it out for myself yet, but my buddy ordered one and when he’s ready I’ll help him with the install using that new cable.
 First, find the camera input in the harness, plug in the camera feed and grab a little electrical tape to make sure it stays put. I like to tape these connections since I have no interest in pulling the dash after I go over a few bumps in case the cable has wiggled loose.
 I’m not using any of the other plugs at the moment, but what’s to say I may not want to use them for something in the future? To keep them from flopping around, I taped them to each other.
 Since I’ll have some extra harness pieces behind the dash, I added a little foam padding to minimize any rattling noises. If you don’t have any foam on hand, just cut a beer koozie in half.

 You can see the loose ends all taped up above and ready to tuck behind the head unit.
 Now that the cable is ready and the head unit has been removed, you can see that there are two 22-pin slots on the back. All of the factory connections go in the right slot while the new wiring harness goes in the left where the red arrow is pointing. This is a fantastic time (if you haven’t done so already) to test out your camera to make sure you are getting a signal and you can see the camera image on the 430N’s screen.
Did it pass the test? Take a minute to rejoice! When you are done with your celebration, remove your rear tail light housing on the passenger side in preparation for the next step.
Run the wiring from the head unit behind the dash towards the passenger side and down behind the kick panels. Feel free to remove your glove box if you need an easy way to get an extra set of hands back there. Keep running the cable towards the rear of the Jeep down the passenger side behind the plastic panels. There are other wiring harnesses running front to rear that you can attach your wiring to keeping it nice and neat. Once you get to the rear corner of your JK, pull up a little carpet to find a rubber grommet with a wiring harness running through it.
**Warning, this part is kind of a PITA** Fish the RCA plug through the rubber grommet down into the tub of the Jeep. If you have a spreader that can make this a lot easier. I used a set of 11″ 45 degree needle nose pliers as a spreader to get the plug through the grommet. If you did this part right, you should see an RCA plug dangling in the opening where your tail light used to be. As a side note, this isn’t the only way to run the video feed to the camera. I’ve seen it run under the cargo tray next to the drain plug as well. I personally prefer my method, but the choice is completely up to you as long as the video cable gets to the camera, you win!
Next, go get the other plug that came with the camera kit. It’s the one that has a red and a black wire (power/ground for the camera) that plugs into the non-video plug coming out of the camera. What we are going to do is jump these wires onto the existing power sources going into your rear tail light on the wiring harness.
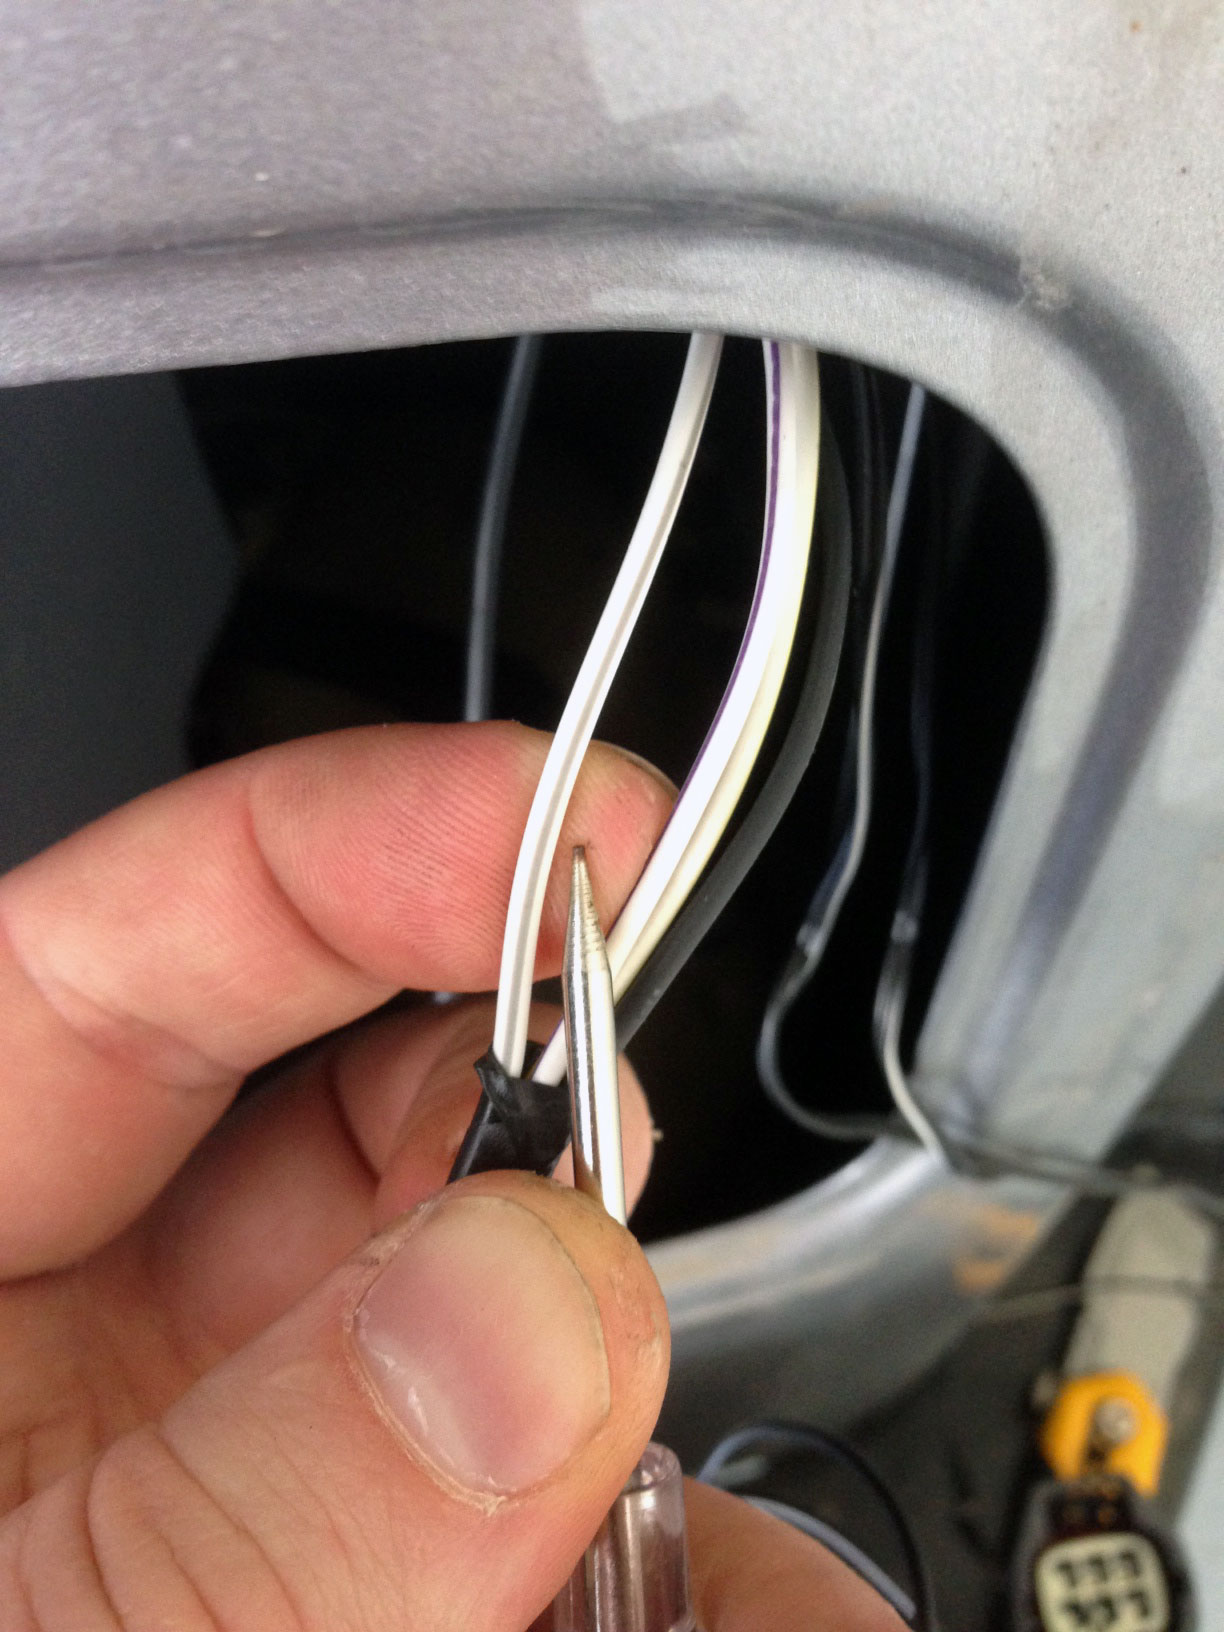 Grab the tail light wiring harness and use your tester to determine which wires you’ll need. I’ll give you a hint… black is ground. To test, turn the key to the accessory position and put the vehicle in reverse. Touch the tester to the connectors in the harness and when your tester lights up, that’s the cable you want. I’m 90% sure it’s that white wire with a gray stripe pictured above but it’s been a few weeks since I completed the install and my memory is getting a little foggy. If your tester is flashing while maintaining a good contact, you’ve found the turn signal.
With the wiring connected to power and ground, feel free to plug in both cables (power/ground & video feed) to the camera and test it one more time. This is a great time to decided on a mounting location if you haven’t done so already. It’s also the last chance you have before the point of no return… Making holes in your Jeep!
 I wanted my camera to go right smack in the center of the bumper, but that’s what works for me. You should put your camera where ever you can get the most visibility and wherever it works for you. I taped off the entire area to make it easy to draw on in pencil and measured off dead center. Using a center punch and a small sledge hammer, I made my first mark to help guide the hold borer that came with the camera kit.
If you have a stock rubber bumper, the hole borer that came with the kit will probably work just fine. For anything a little heavier like a steel bumper, I’d suggest drilling a pilot hole the same width as the drill bit on the hole borer first and then using that hole as a guide to bore out the full diameter hole needed for the camera. Why the extra step? Because the drill bit on the hole bore is garbage. Mine snapped in half as I was drilling the initial hole. With the hole drilled, take a metal file to edges and a little flat or semi-gloss black to cover up any exposed metal. Let the paint dry for an hour or so, and then go get a friend to help you out with the next part… Aligning & installing the camera. The actual install is incredibly simple. You really do just pop the camera in the hole you just drilled. But WAIT, before you do, make sure the camera is facing right side up and the guide marks are parallel to the ground. The camera itself has no markings on it, so you’ll have to kick on your screen to help you align it exactly how you’d like it. This is where a friend comes in handy. One of you to rotate the camera and the other to watch the screen.
Once you have it aligned perfectly, slowly but gently push the camera into the bumper hole. I really hope you have this aligned because once it’s in, that camera ain’t coming out!
 At this point, all you have left to do is a little tidying up. Reconnect the wiring harness and put your passenger side tail light back on (4 screws). Reinstall your dash (4 screws), glove box (if you removed it) and you, my friend, are done! I hope you enjoy your new camera.
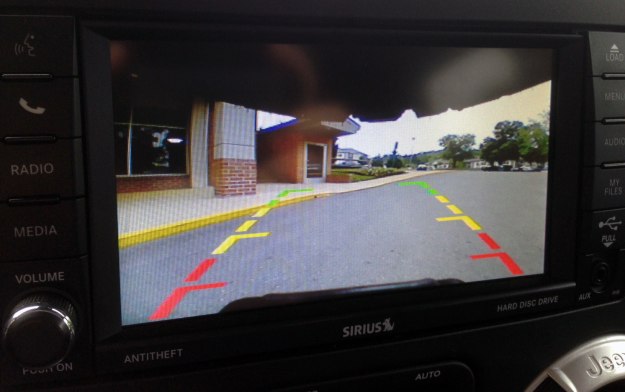
Despite my long journey to finish this mod, I’m really happy I did it. The camera displays a very clean image on the screen and has helped me park (especially parallel parking!) with out having to worry about backing into anyone or anything. Knowing what I know now, I’m pretty sure I could wire this up in about an hour or so with all the parts on hand and the CPU flashed. For under $100 in parts/labor, this mod is well worth the effort.
- $16 – Gino 1/4″ CCD Flush Mount Waterproof Backup Camera
- $25 – PAC CHYRVD Rear Video Retention Cable
- $50 – Labor for CPU StarScan Flash
